
Introduction to Asuka Langley
Asuka Langley Soryu is a prominent character from the acclaimed anime series Neon Genesis Evangelion, which has garnered a substantial following since its release in the mid-1990s. As one of the central characters, Asuka has become an iconic figure in pop culture. Her complexity, fierce independence, and evolution throughout the series resonate with many fans, making her a frequent subject for artistic representation.
Asuka, who serves as the pilot of the Evangelion Unit-02, is characterized by her fiery personality and determination. She often displays a bold and brash demeanor, masking a more vulnerable and insecure side, which emerges as the series progresses. Her character represents themes of struggle, identity, and the pursuit of acceptance, resulting in a multifaceted persona that captivates viewers and artists alike.
This popularity translates into a desire among many to learn how to draw Asuka Langley step by step. The character’s distinctive features, such as her vibrant red hair, sharp blue eyes, and military-inspired outfit, offer an exciting challenge for illustrators. The combination of her dynamic expressions and intricate costume design makes her an appealing subject for both seasoned artists and beginners looking to hone their skills.
Additionally, Asuka’s influence stretches beyond the anime world, permeating various forms of media and fan art. Whether through digital illustrations, traditional sketches, or cosplay, the character has inspired countless creative interpretations. Consequently, understanding how to draw Asuka Langley not only provides a valuable artistic exercise but also enables artists to connect with a cultural phenomenon that continues to inspire and evoke strong emotions among its audience.
Gathering Your Materials
Before embarking on the artistic journey of how to draw Asuka Langley step by step, it is crucial to gather all the necessary materials. Having the right tools can significantly enhance your drawing experience and the final outcome. Start with a selection of pencils. Ideally, you should opt for a range of graphite pencils, typically from 2H for fine lines to 4B for darker shading. This variation will allow you to achieve the desired contrast when capturing Asuka’s details.
Next, an eraser is essential for refining your artwork. A kneaded eraser is particularly helpful as it allows for gentle corrections without damaging the paper. Alongside traditional erasers, consider including a plastic eraser for removing heavier graphite marks. Additionally, investing in quality paper is vital. For pencil drawings, medium-weight sketch paper is advisable, providing texture and support for various drawing techniques.
If you plan to add color to your artwork, colored pencils or markers can be beneficial. High-quality colored pencils allow for blending and layering, perfect for capturing Asuka’s iconic red hair and detailed uniform. Alternatively, alcohol-based markers offer vibrant colors and smooth application. However, remember that using markers requires specialized paper to avoid bleed-through.
Lastly, consider additional tools such as blending stumps or tortillons for smudging pencil lines or adding depth to your shading. Having a ruler can assist in keeping proportions accurate, and a sharpener is indispensable for maintaining your pencil points. With these materials, you will be well-equipped as you learn how to draw Asuka Langley step by step, ensuring a more enjoyable and successful creative process.
Understanding Asuka’s Appearance
Asuka Langley Soryu is a character from the popular anime series “Neon Genesis Evangelion,” known for her vibrant personality as well as her distinctive appearance. To accurately depict Asuka in your artwork, it is essential to observe and understand her key physical features, which contribute to her identity within the series.
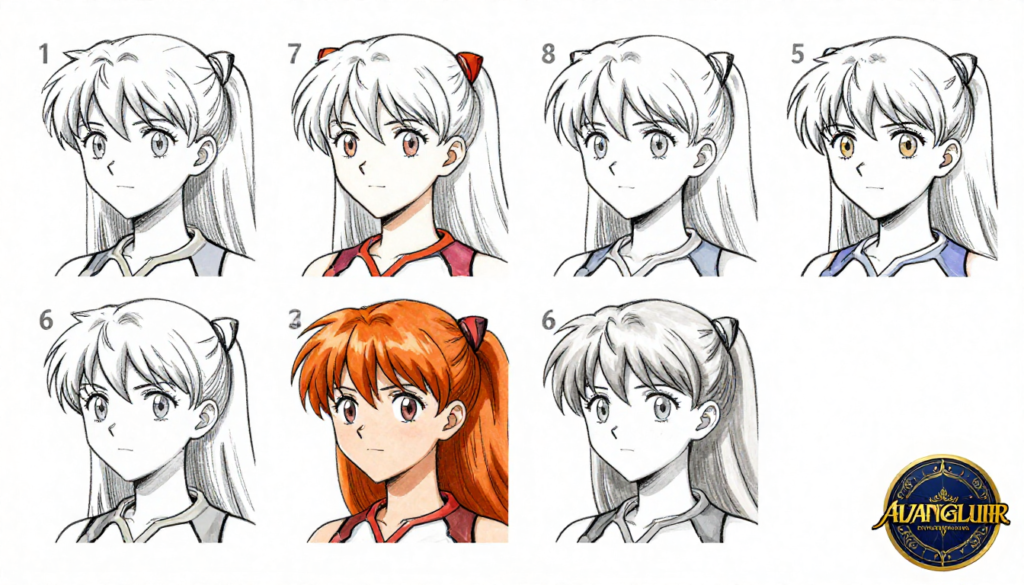
Asuka is characterized by her striking red hair, styled in twin pigtails that cascade down her back, often accentuated with a forehead fringe. This fiery hair color symbolizes her strong and passionate nature, making it one of her most recognizable traits. When learning how to draw Asuka Langley step by step, pay special attention to the way her hair falls and the movement depicted in it, capturing the energy of her character.
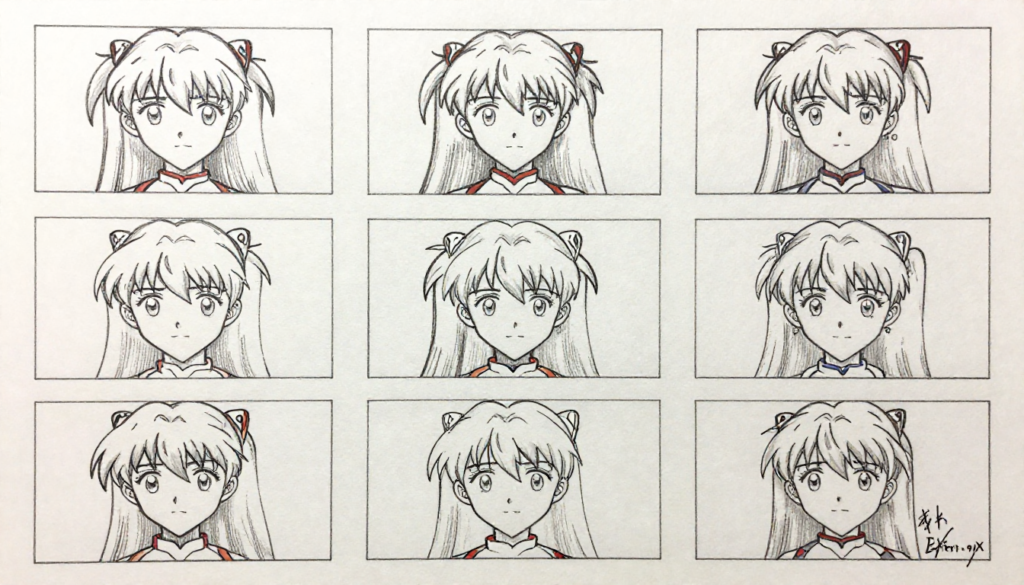
Her eyes are another significant defining attribute; Asuka possesses large, expressive eyes that are a vibrant shade of blue. These eyes convey a range of emotions throughout the series, embodying both intensity and vulnerability. Artists should focus on accurately portraying the shape and size of her eyes, as well as the emotional expression they reveal, which adds depth to the character representation.
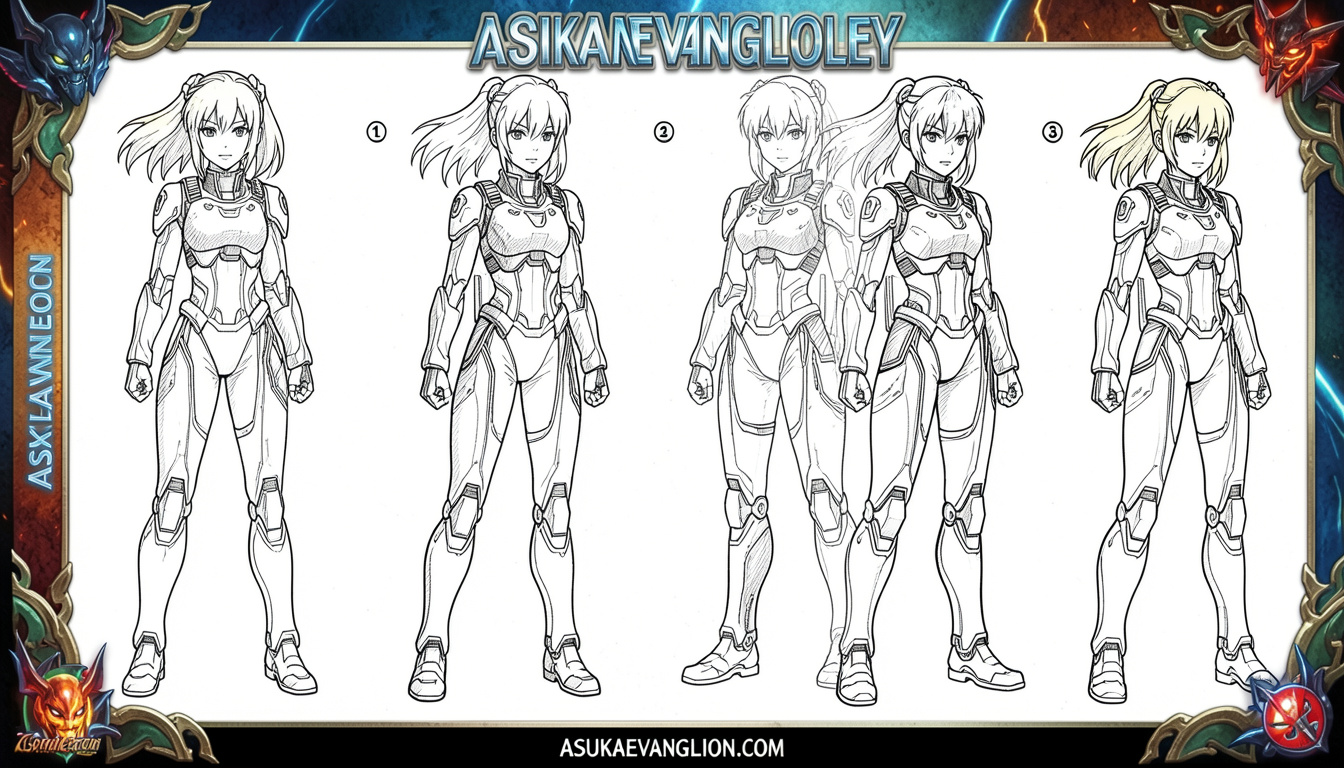
Asuka’s attire, typically comprising a form-fitting red pilot suit, is vital for her character silhouette. The suit displays her athletic build and allows for freedom of movement, reflecting her determination as a pilot. When drawing her outfit, consider the suit’s design details, such as the distinct patterns and color accents that provide a sense of dynamic action. Furthermore, her iconic plugsuit features details like straps and the her complex logos, which should be carefully rendered to enhance the authenticity of your representation.
By understanding these essential elements of Asuka’s appearance, artists can effectively capture her likeness in their drawings. Mastering the aspects of her hair, eyes, and outfit lays the foundation for creating a compelling interpretation of Asuka Langley, paving the way for successful execution of how to draw Asuka Langley step by step.
Step 1: Sketching the Basic Shape
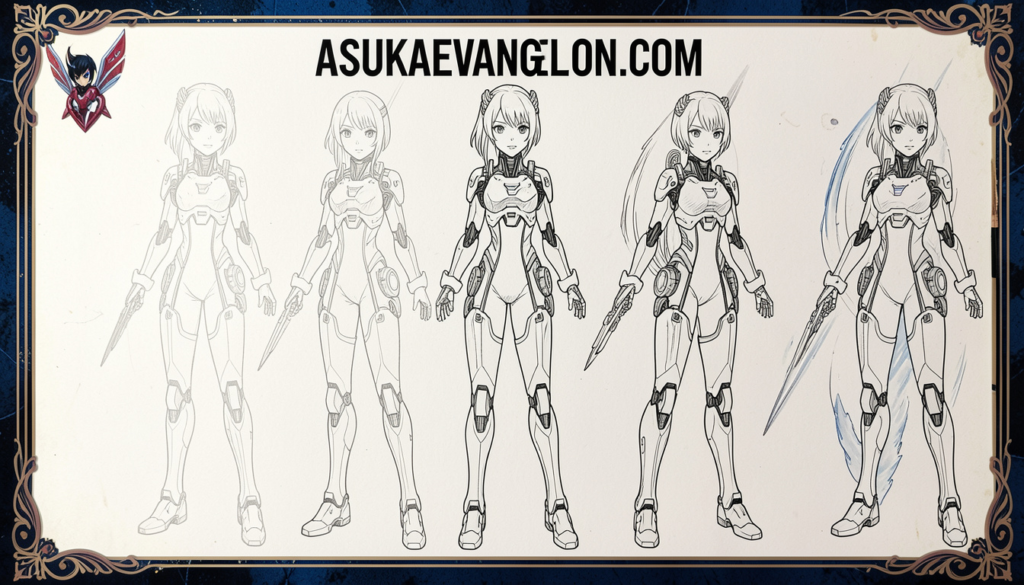
When embarking on the journey of how to draw Asuka Langley step by step, the initial phase is crucial: sketching the basic shapes that will serve as the foundation for your drawing. Start by considering the pose you wish Asuka to assume, as this will dictate the overall proportions and alignment of her body. Begin with a light pencil to outline basic geometric shapes that will represent her head, torso, arms, and legs. Using simple forms like circles for the head and shoulders, ovals for the torso, and rectangles for the limbs not only simplifies the process but also provides a clear framework for Asuka’s figure.
Next, pay attention to the relationship between these shapes. For example, the circle representing her head should be positioned above the torso shape, while the limbs should be connected smoothly to maintain a correct anatomical structure. Ensure that the proportions are accurate, as this will define the character’s essence. Asuka has distinctive features, from her spiky hair to the characteristic plug suit, which will later come into play once the basic shape is established. Therefore, focusing on proportionate spacing in this stage is essential.
Once the basic shapes are laid out, gently refine the outlines of these forms, connecting them to create a more cohesive and recognizable silhouette. This preliminary sketch does not have to be detailed; its primary purpose is to achieve a balanced structure. An accurate outline will serve as the backbone when you proceed with the next steps in how to draw Asuka Langley step by step. Remember, precision at this early stage can significantly improve the overall look of your final drawing, so take your time and continually assess the shapes you’ve created.
Step 2: Adding Details to the Face
In this step, we will delve into how to draw Asuka Langley from the popular anime series, focusing specifically on enhancing her facial features. Understanding the nuances of her expression is vital to capture her character accurately. Start by refining the outline of her face, which is slightly angular and adds to her confident personality.
Next, it is essential to focus on Asuka’s eyes. Her eyes are a significant aspect of her character, conveying a variety of emotions. To draw them, create almond-shaped forms with a slight upward curve at the outer edges, reflecting her spirited and sometimes defiant nature. Make sure to include the iris and pupils, typically drawn larger to imbue her with vibrancy. When coloring, a gradient effect from dark to light will enhance their liveliness. Additionally, don’t forget to incorporate eyelashes and highlights for depth.
Moving down, concentrate on drawing her nose and mouth. Asuka has a small, slightly upturned nose that conveys her liveliness. Use a simple line for the bridge and a tiny curve for the nostrils to reflect her youthful charm. For the mouth, opt for a subtle smile or a confident smirk. This element can greatly influence the overall expression, so ensure you position her lips correctly to align with the desired emotion.
Finally, Asuka’s hair is an important detail to add character. She sports distinctive red hair styled into twin tails. Pay attention to the volume and movement of her hair when sketching, using wavy, flowing lines and layering to create a sense of texture. Adding highlights with a lighter tone can bring dimension, making it appear lively and dynamic.
By attending to these details—eyes, nose, mouth, and hair—you lay a solid foundation for bringing Asuka Langley to life on your canvas. This thoughtful approach amplifies her unique personality and will significantly enhance your drawing.
Step 3: Outlining the Body and Outfit
Once you have sketched the basic framework of Asuka Langley, the next pivotal step in learning how to draw Asuka Langley step by step involves outlining her body and outfit. This stage is crucial for defining her character and ensuring that the proportions are accurate. Start by reviewing the sketch you created and refine the shape of her body. Remember that Asuka is a dynamic character, so capturing a sense of movement can be advantageous. Use smooth, flowing lines to outline her arms, legs, and torso.
Asuka’s iconic pilot suit deserves special attention as you outline the clothing. It is characterized by its form-fitting design, which highlights the contours of her figure. Draw the outlines of her pilot jumpsuit carefully, ensuring that you maintain proportion by following her figure’s natural curves. The key to achieving a realistic look lies in the details; thus, pay extra attention to how the fabric folds and creases around her joints and curves. Make note of where the material would naturally gather, such as at the elbows and knees, to create a feeling of depth in your drawing.
When outlining the details of her suit, include the elements that make her design unique, such as the segmented patterns and logos that adorn her outfit. Capturing these details will contribute significantly to the overall authenticity of your drawing and allow viewers to recognize Asuka instantly. Remember to use varying line weights to emphasize different elements of her design, which will provide a greater sense of realism. This approach will help you understand not just how to draw Asuka Langley step by step, but also how to bring her character to life on the page.
Shading and Coloring Techniques for Asuka Langley
After you have successfully sketched Asuka Langley, the next crucial step is focusing on shading and coloring techniques that can add depth and realism to your drawing. When approaching how to draw Asuka Langley step by step, the shading will play a key role in bringing your artwork to life.
To start, it is essential to choose the right color palette. Asuka typically wears a vibrant red and orange outfit, and her hair is a striking auburn. Selecting colors that are rich and complementary will help emphasize her character’s fiery personality. For skin tones, consider using a base color that reflects natural skin, followed by subtle variations for shadows and highlights. Always remember to refer to reference images when selecting the shades you intend to use.
Blending techniques are also paramount in this stage. There are various methods one can adopt, such as using colored pencils, markers, or watercolors. For colored pencils, layering light colors first and gradually adding darker shades is fundamental. This way, you can achieve a smooth gradient effect, which is essential for realistic skin and hair textures. Alternatively, if using markers, you can apply a base layer and then blend it using a lighter color or a colorless blender to soften the edges.
Highlights are another critical aspect of shading. They can effectively convey light and depth in your drawing. For Asuka, consider where the light source is coming from and apply lighter shades or even white on areas that would naturally catch the light, such as her hair and the reflections on her outfit. Also, experimenting with digital coloring tools can provide additional options, such as opacity adjustments and gradient effects.
This overall approach, integrating thoughtful color selection, blending techniques, and careful highlighting, will significantly enhance your ability to draw Asuka Langley step by step, ensuring a more dynamic and visually appealing result.
Final Touches and Refinements
Once the foundational elements of your drawing are established, the final touches serve as an important stage to enhance the overall quality and visual appeal. When learning how to draw Asuka Langley step by step, paying attention to the details during this phase will significantly improve your artwork.
One of the key aspects to focus on is highlighting certain areas of the drawing. This involves identifying where light naturally falls in your composition, such as on Asuka’s hair and the folds of her clothing. By adding highlights using a lighter color or a white gel pen, you can create depth and dimension, making your character appear more dynamic.
In addition to highlighting, adjusting contrasts can elevate your drawing further. Switching between darker and lighter shades enhances the visual separation between elements. For instance, deepening the shadows in Asuka’s outfit and around her features can help to frame her face and draw attention to her expressive eyes. A well-executed contrast adjustment can dramatically boost the three-dimensional feel of your character.
Furthermore, examining your artwork for any necessary corrections is critical. This could involve refining lines, smoothing out uneven textures, or ensuring proportions are correct. Utilize an eraser or a blending tool to blend colors as needed. This step is particularly crucial when you approach the end of your drawing journey; it can mean the difference between a good drawing and a great one.
By integrating these final touches into your process of how to draw Asuka Langley step by step, you ensure that every element of your artwork is polished. Thus, every detail contributes cohesively to the final piece, capturing the essence of Asuka Langley’s character.
Conclusion and Encouragement
In conclusion, mastering the technique of how to draw Asuka Langley step by step not only enriches your skills but also provides a sense of accomplishment. Throughout this tutorial, we have navigated various aspects, including understanding basic shapes, adding character details, and utilizing color effectively. By following each step, you have witnessed the transformation of a simple sketch into a dynamic illustration, embodying the essence of Asuka Langley.
It is essential to remember that drawing is a personal journey. Each artist has a unique style, and embracing yours can lead to more creative expressions. As you finish your piece, consider how you can add your personal touch to Asuka’s character, whether through unique poses, expressions, or colors. This individuality not only enhances your artwork but also fosters a deeper connection with your characters.
We encourage you to practice regularly, as consistency is key when honing your drawing skills. The more you draw, the more comfortable you will become with different techniques and styles. Don’t hesitate to revisit this guide whenever you need a refresher on how to draw Asuka Langley step by step.
Lastly, we would love to see your artistic journey! Share your drawings, sketches, or any progress you’ve made while following this tutorial. By exchanging feedback and inspiration, we can all grow as artists and continue to improve our craft. Happy drawing!
Also read asukaevngelion.com
Email: johanharwen314@gmail.com
Author Name: Johan Harwen